People often say, “Concrete is easy to paint because it’s so stable.” If that’s so, then why do we see so many exterior coating failures on concrete buildings? The answer is that often we are painting some other material in addition to the concrete on these buildings. In addition to that concrete, we may be painting a patch of unknown material. For example, tilt-up wall construction remains one of the most recommended construction methods for large commercial buildings. Tilt-up walls are less expensive to build than cast-in-place concrete, and construction can be quicker and safer.
Often, when tilt-up concrete panels are erected, there are small voids or holes at the surface, usually referred to as “honeycombs” or “bug holes”. These form as a result of air entrapment during placement, compaction, and curing of the concrete. Prior to painting, it is customary to fill these holes with a cementitious patching or sacking material. As long as the patching is confined to filling the small holes, there shouldn’t be a problem with primer and paint adhering to the concrete, provided the substrate has been properly cleaned. Problems arise when the patching is not limited to the small voids but rather is applied to large wall areas due to cups, dips, grinding of seams, etc.
Cohesion Failure
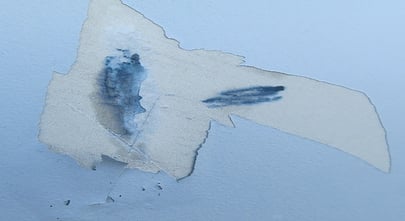
Recently, I was involved in a case that exemplifies the necessity to pay attention to all of these materials. The work was done on several large warehouse buildings where the entire exterior was painted. The acrylic coating system, which comprised a primer and topcoat, was spray applied and back rolled. Within one year, the paint was spontaneously delaminating (Photo 1).
 Adhesion tests were performed, and all patched areas, which were numerous, failed. In every instance, it was noted that some of the patching material stayed adhered to the rear of the delaminated paint while some remained on the wall. The client called me in to investigate this failure.
Testing, Testing
My investigation involved several field tests. Painting contractors should perform these tests before starting a job to avoid expensive failures later on.
Several standards from the Painting and Decorating Contractors of America (PDCA) provide guidance on painting tilt-up construction. PDCA P17, “Field Painting of Smooth-Faced Tilt-Up Concrete,” states that prior to applying coatings, the painting and decorating contractor should determine the pH of the surface of both the smooth-faced tilt-up concrete and the patching material. pH is a measure of the acidity or alkalinity of a substance.
ASTM D4262 describes the procedure for pH measurement. A pH of 7 indicates neutrality, while readings below 7 indicate increasingly acidic conditions, and pH readings above 7 indicate increasingly alkaline conditions. The pH of properly cured cementitious products, like concrete or stucco, is in the range of 8 to 10. Higher numbers could indicate an improper mix or cure or the presence and migration of moisture. The pH on the surface of the concrete and patch should be determined by marking the area with a pH pencil, moistening the area with distilled water, and comparing the color to a pH chart.
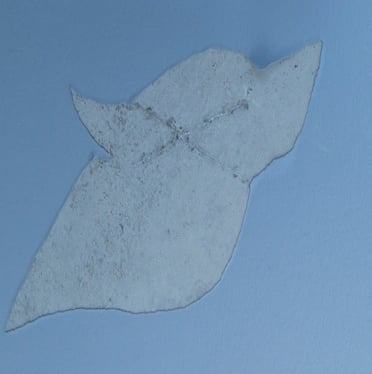
Coating application should not be initiated until the surface pH is within the manufacturer’s recommended range for the specified coating system. If the pH is higher than 10, the concrete or patch may not be fully cured. High substrate pH can lead to paint failures such as alkali burn and saponification. Photo 2 shows a highly alkaline substrate in this particular case, which indicates that the patching compound had not completely cured.
PDCA P4 states that while the contracting entity has the responsibility to determine that a surface is complete and that the “quality of appearance” is such that it is ready for finish painting or wallcovering, the painting and decorating contractor is required to inspect surfaces to determine, by reasonable and visible evidence, that the finish coat will satisfactorily adhere to the surfaces and will perform as specified.
One such visual means is a chalk test in which the stability of the patching material is assessed in accordance with ASTM D 4214. In this test, a black cloth is rubbed against the surface of the patching material. If a large amount of powder or dust is transferred to the cloth, then multiple chalk tests at the same location should be performed. If each successive test has high levels of chalk transfer, then the patching material is friable and dusting; it is not just superficial powder. If this occurs, do not prime or paint this surface!
In my experience, the most important test is to assess the adhesion of the painting system. PDCA P17 recommends that the painting and decorating contractor prepare a benchmark sample of the specified coating system, which, in this case, involves preparing, priming, and painting several of the smooth-faced tilt-up concrete panels in accordance with PDCA Standard P5. Once the coating has cured, adhesion tests should be conducted in accordance with either ASTM D3359 or ASTM D7234.
ASTM D3359 describes testing for adhesion using tape. In this test, incisions are made through the coating in an X pattern if the coating thickness is 5.0 mils (127.0 microns) or greater. A cross-hatch pattern is used if less than that. Tape, such as Scotch 202 adhesive, is firmly applied to the area and then removed in accordance with the test method. The adhesion of the coating is then evaluated by the amount of paint that is removed. This adhesion test method is best used when the coating system is smooth and relatively thin. In this instance, all adhesion tests conducted over patch material yielded poor results, whereas all tests with the paint applied directly to the concrete had good results.
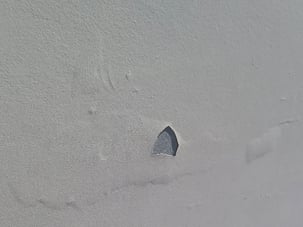 When a coating is textured and relatively thick, the tape will not properly adhere. In these cases, adhesion should be assessed per ASTM D6677, “Standard Test Method for Evaluating Adhesion by Knife.” The first step of this test is to make two cuts into the coating down to the substrate. Using a sharp knife, the cuts should be made at a 30- to 45-degree angle between legs and should intersect to form an X. Using the point of the knife and beginning at the vertex of the angle, one should attempt to lift up the coating from the substrate or from the coating underneath. Photo 3 depicts a poor result of this test on the warehouse buildings.
Prevention Plan
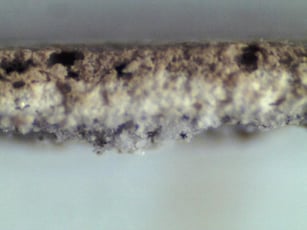
The paint was delaminating because of a cohesion failure of the patching material, as seen in Photo 4. Cohesion is the force thatholds a material together. In these instances, the patching material was friable, or crumbly. Unfortunately, there is no topical fix for this problem. Had this issue been discovered prior to application of the primer, then a special primer may have yielded satisfactory results. If poor adhesion is determined after the primer and paint are applied, then all patching and paint must be removed, a suitable high-strength patch applied where needed, and the paint system re-applied.
The delamination failures mentioned in this article could have been anticipated and even prevented had the painting contractor performed simple tests and prepared benchmark patch samples, prior to proceeding with the job, to assess the adhesion of the coatings. Taking a little time to perform these important tests on benchmark samples can save hundreds or thousands of hours redoing the job and a tremendous amount of aggravation for the painting contractor.
This article was originally published in the May 2019 issue of CoatingsPro Magazine. See the issue here.
Photos courtesy of Coatings Consultants, Inc.
 Bob Cusumano is president of Coatings Consultants, Inc. His consulting firm analyzes paint failures, writes coating project specifications, and provides expert witness testimony. He teaches classes on blueprint reading, estimating, and management skills to painting contractors, and he frequently speaks and writes articles regarding coatings failures.
Bob is a former painting contractor and a former national PDCA President. He was chairman of the PDCA’s Cost and Estimating Committee and the principal author of the PDCA Cost and Estimating Guide. He has taught classes on blueprint reading and painting estimating to industrial, commercial, and residential painting contractors around the country since 1975.
His education includes a Bachelor of Metallurgical Engineering and a Master of Science Degree in Engineering, specializing in corrosion research, both from the University of Florida. Contact info: bob@coatingsconsultants.com.