Standards, testing and proven industry guidelines are key to performance.
A unique seven-story building in the Midwest exhibited leakage problems resulting in interior finish damage and mold problems. The leakage problem, evaluated following the protocol of ASTM E2128,1 identified two major water entry paths. The first and most severe was leaking windows, particularly around packaged through-wall air conditioner (PTAC) units as well as at frame joints and glazing gaskets.
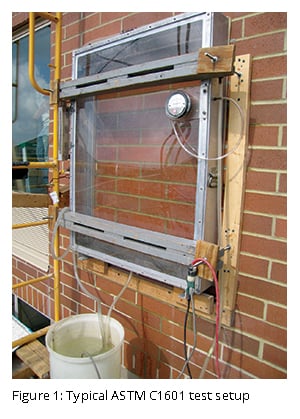
Two before-and-after investigative ASTM C16012 tests were conducted (Figure 1). Although there are no industry standards for permeability rates, measured rates are judged to be reasonable for masonry assuming that there was a functional drainage cavity and flashing. Unfortunately for this building, water which penetrated the wall could not be handled by a deficient flashing system. Unsatisfactory initial installation of windows and masonry meant both had to be corrected to prevent further infiltration and damage.
Methods of Correction
The customary approach to repairs for leakage problems like this would have been to:
- Repair window openings, particularly the window flashing;
- Repair windows and PTAC sleeves; if not economical or feasible, replace them;
- Repair or replace the masonry flashing.
Windows and PTAC unit problems could be addressed in this manner, but the masonry presented several obstacles to conventional repairs. The non-loadbearing masonry envelope was constructed with a single wythe through-the-wall (TTW) partially reinforced brick, which was stacked from grade to roof and anchored laterally at floor lines. Cells containing reinforcing bars (rebar) were grouted, but remaining cells were not. The wall was laid overhand from the floor slabs, precluding the possibility of creating a drainage cavity behind the brick using studs, sheathing and a weather-resistive barrier. Given this construction method and the type of masonry, the wall was intended to function as a barrier wall rather than a cavity wall.
Standard recommendations which would have enhanced barrier wall performance, such as applying parging, dampproofing or non-moisture sensitive insulation to the back of the wall, were not followed at initial construction. Batt insulation was installed between interior studs in direct contact with the masonry and the interior wall was finished with paper-faced drywall.
 Without a defined drainage cavity capable of managing water without adverse effects, the very concept of flashing is questionable, yet a valiant attempt was made. A plastic sheet material was laid in the bed joint at floor line. Without sheathing, a drainage cavity and unsealed laps, the intended function of this plastic sheet flashing material is unclear.
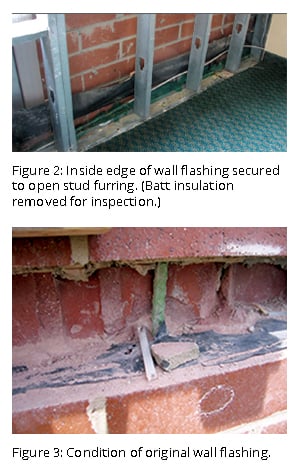
The inside edge of the flashing was attached to the outside face of the open interior furring studs (Figure 2). The outside edge of the flashing was held back from the brick face, penetrated by rebar, not adhered to the substrate and dammed by mortar as shown in Figure 3.
Additionally, the sheet masonry flashing was not integrated with window flashing and a plastic vapor retarder was installed behind the drywall, precluding effective drying to the interior. If the wall had performed properly, it could have been considered an example of brilliant value engineering. Given the leakage problems, the wall is considered an unfortunate deviation from industry practices, resulting in nonperformance behavior as well as a repair challenge.
Obstacles to Flashing Repair
Conventional repair of the flashing would not be easy and might not have solved the masonry problem because of several challenges:
- Since the wall was stacked for seven stories, removing bands of brick could be risky;
- Penetration of the flashing by rebar, which was a problem in the original construction, would remain a problem during the repair;
- Removing and replacing TTW brick presents special problems because face shell must be removed to slide the replacement brick around the rebar and then somehow restored;
- Cells containing rebar must be regrouted;
- There would still be no defined drainage cavity and batt insulation would remain in contact with the back of the brick;
- Removing and replacing large portions of TTW brick changes the stress distribution within the wall.
While all six challenges are of concern, the last was of particular concern. When a portion of stacked TTW brick is removed for flashing repair, the gravity dead load is transferred to adjacent brick and replacement brick will have no dead load stresses. For a one-story brick veneer wall, stress redistribution has not proven to be a problem. For a seven-story wall, there was concern that changing stress distribution in this way could initiate cracking for the same reason that an unreinforced opening in structural masonry would. It was not difficult to decide that replacing the flashing was probably not a good idea.
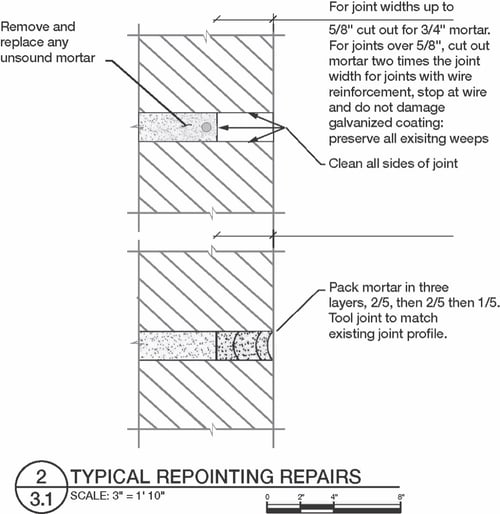
Figure 4: Repointing detail on repair drawings.
Repointing as Alternative Means of Repair
Although results of the C1601 tests indicated that the masonry permeability rate might be acceptable for a wall with a functioning drainage and flashing system, the dysfunction of the actual flashing system mandated some kind of response. It was decided to essentially abandon the existing flashing system and use repointing to reduce the permeability of the wall and rely on the absorptive and drying properties of the masonry to compensate for whatever permeability remained.
As part of the repair plan, a repointing detail was prepared (Figure 4). The detail is in essential conformance with BIA recommendations.3 It has been the author’s experience that repointing can reduce the permeability of a brick wall to negligible and barely measurable rates. This finding is corroborated by Whitlock4 and Coney5. Two before-and-after C1601 tests of a mockup area were specified as recommended by Hoigard.6,7 Tests were not specified as a quality control measure – after all, the detail was abundantly clear and repointing is routine – but to determine if the improvement achieved would justify abandoning the existing flashing. Repointed areas looked very good during a visual examination after the fact. Test results, in the table, distinctly indicated otherwise. Remarkably, the permeability rate actually increased at one mockup test location and rates at both locations can hardly be considered negligible. How could this happen?

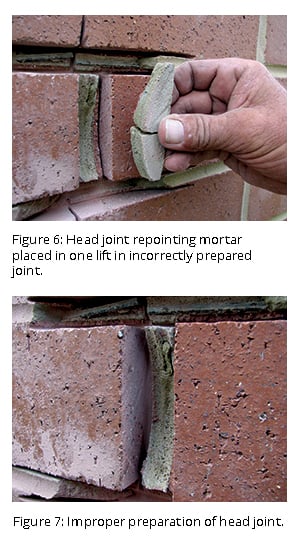
Repointing was diagnosed by cutting out representative head and bed joints. Bed joints (Figure 5) were clearly not placed in three lifts as required in the details. Bond of the pointing mortar to the brick surface was poor and failed during the sawing operation. Head joints (Figures 6 and 7) were also not placed in three lifts and the only apparent preparation was to plunge a grinder into the head joint as far as it would go without cutting the brick above and below the joint. The bond of the head joint pointing mortar was so weak that the mortar could be removed like a slice of bread. Unfortunately, the repointing proved deficient and, consequently, repointing accomplished nothing.
Expected Practices and Lessons Learned 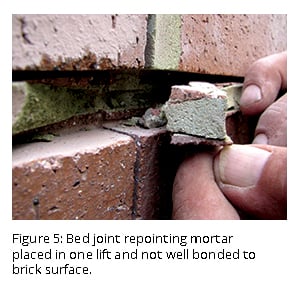
Specifying before-and-after C1601 tests in limited mockup areas averted a costly whole building repair disaster. The BIA recommendation to repoint in three lifts to compensate for shrinkage of the pointing mortar is relevant and necessary. Joint preparation, including completing the head joints by removing half-moon remnants of a plunge cut with a grinder, is critical. Regardless of the tools used, be they grinders, pointing chisels, routers, oscillating saws or any combination of them, joint preparation and cleaning of the bonding surfaces of the brick are absolutely essential. If the objective of a repointing project is to improve performance rather than just improve appearance, the lessons from this case study are simple:
1. Effectiveness of repointing cannot be judged by appearance
2. Include before-and-after
3. C1601 Include a pre-construction briefing before and inspection during work.
Without these measures, repointing can turn out to be a costly and ineffective exercise. Resources and precedents are available for repairing and maintaining existing masonry. Many are identified in this article. Shortcuts rarely provide long-term desirable outcomes.
This article was originally published in SMART|dynamics of masonry| dynamicsofmasonry.com
Sources
1ASTM E2128 – Standard Guide for Evaluating Water Leakage of Building Walls, ASTM International, Conshohocken, Pennsylvania.
2ASTM C1601 – Test Method for Field Determination of Water Penetration of Masonry Wall Surfaces, ASTM International, Conshohocken, Pennsylvania.
3Technical Note 46 – Maintenance of Brick Masonry, The Brick Industry Association, Reston, Virginia, December 2005.
4A Rhett Whitlock, Water Penetration Rate Characteristics of Masonry Walls, Ninth North American Masonry Conference, Clemson, South Carolina, June 2003.
5Coney W B and Stockbridge, J G, "The Effectiveness of Waterproofing Coatings, Surface Grouting, and Tuckpointing on a Specific Project,"Masonry: Materials, Design, Construction, and Maintenance, ASTM STP 992. H A Harris, Ed, American Society for Testing and Materials, Philadelphia, 1988. pp.220-224.
6Kurt R Hoigard, Robert J Kudder, and Kenneth M Lies, Including ASTM E514 Tests in Field Evaluations of Brick Masonry.
7Melander, John M and Lynn R Lauersdorf, Masonry: Design and Construction, Problems and Repairs, ASTM STP 1180. American Society for Testing and Materials, Philadelphia, 1993.

Robert J. Kudder, PhD, PE, SE, FASTM, is a structural engineer and senior consultant at Raths, Raths & Johnson in Willowbrook, IL, with expertise in observation, field and laboratory testing and repair of non-performing and distressed structures, particularly the performance testing and evaluation of building walls. He is active in The Masonry Society, American Society of Civil Engineers, Structural Engineers Association of Illinois, Construction Specifications Institute, Exterior Design Institute and ASTM E06.55.15-Water Leakage Through Walls, E06.55-Performance of Building Walls, E06.58-Performance of Exterior Insulation and Finish Systems. Kudder earned a Bachelor of Engineering from The Cooper Union and a Doctor of Philosophy and Master of Science from Northwestern University. Contact info: rjkudder@rrj.com and 630.325.6160.