
- By: Robert “Zeke” Zdenek,
- President, PSG Consultants
The “building envelope” is the exterior skin or shell of a building that protects the indoor environment from the outdoor elements. So, what are the components of the building envelope that are so important? Starting at the top and working to the bottom, they are as follows:
- Roofing System
- Window System
- Sealants
- Air, Water & Vapor Barrier
- Cavity/Rainscreen & Barrier Walls
- Waterproofing System
The long-term success of the individual building envelope components not only involves a good design and proper installation of the products, but relies heavily on an annual maintenance program. Like a car or an elevator, the building envelope needs to be maintained. In the following discussion of each envelope component, maintenance items that need regular attention are listed for easy reference so building owners and managers can develop key points within their maintenance plan.
Roofing System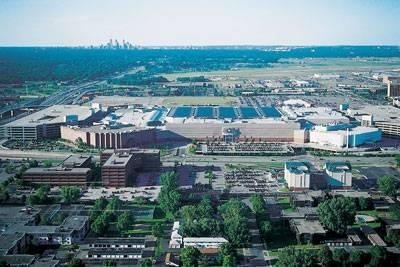
Currently, some local building codes require a roof surface that has a reflectivity of 70 or better. This limits the choices of roofing materials to only white membranes or coatings. However, the roofing material selection depends on the type, use and/or function of the roof itself; shape of the building; the possibility of both horizontal and vertical expansion and the importance of the visual impact of the roof. An example of these considerations would be the Mall of America in Minneapolis, Minnesota. It has a 43 acre roof with 17 acres of skylights. The key maintenance issue for the project was snow removal, so a gray, granulated SBS Modified Bitumen roof system was installed since it could resist the abuse of snow blowers. When damage occurred, the gray granules were scuffed off the capsheet and the black modified asphalt membrane was exposed, which is easily visible and repairable during the annual roof inspection.
One area that has seen the largest growth during the past few years is green or garden roofs. Green roofs have a lot of advantages, but recently some of the negatives have come to the foreground. A few of the advantages include using rain water to feed vegetation, producing better air quality around the building and hiding the appearance of the “ugly” asphalt gravel roof. The negatives are damage that can be caused by vegetation components to the underlying waterproofing membrane layer, the cost of sprinkler system installation and its maintenance, and the potential for costly replacement of the garden materials.
The key to a successful roof selection is matching the specific membrane to the building owner’s needs, which includes the initial budget for the installation and the long-term performance of the roof system.
Ongoing maintenance items:
- Repair membrane and flashing deterioration.
- Membrane seams
- Roof drainage
- Roof top equipment installation and repairs
- Foot traffic wear and tear
- Maintain items listed in the warranty documents.
Window System
This component of the building envelope receives a lot of attention in the initial design, yet often seems to be value engineered during the preconstruction process. A common money-saving approach for multifamily, retirement and college residences is to use a low budget crank window assembly in lieu of a higher performing system. This type of window is, more often than not, a poor choice for these types of facilities. Other low budget systems that are sometimes used are the “weepless” and the nailing-flange windows. There are plenty of attorneys working on cases to resolve water infiltration issues with regard to these types of window assemblies. When a window frame is over 15 feet tall and the design shows a storefront in place of a curtain wall assembly, it should cause enough concern to question the design of the proposed assembly.
Ongoing maintenance items:
- Check the placement and condition of the gaskets.
- Make sure weeps are visible and not caulked shut or filled with debris.
- Inspect window frames to be certain metal joinery is not open.
- Observe interior finishes below the windows for signs of moisture intrusion (i.e. staining, discoloration, mold, etc.).
- Make certain the landscape and sidewalks are not higher than the bottom of the window sill.
- Adjust sprinkler system so it does not spray directly on the windows.
In the preconstruction process sealant joints must be properly designed. This means that the joint width and depth must be designed and installed in an hour glass shape with the width being greater than the depth. Sealant joints should be in a compressive and elongated condition, thus minimizing the shear movement on the sealant joint.
In the last several years silicone sealant technology has come a long way. Designers now have multiple choices depending on the challenge at hand. Architects should be cautious in specifying the use of “new and improved” products. Many of the new products do not have long-term testing to support their claimed performance. The basic building envelope sealants are typically comprised of silicone or urethane. Other chemical based sealants are available for specific uses such as acrylic latex, which is an interior sealant.
Ongoing maintenance items:
- On masonry walls, inspect the sealant used for control joints, windows, penetrations and the façade material changes.
- On tilt wall and precast buildings, inspect the panel joints, and penetration/termination joints for windows, signage, slab-edge, etc.
- On stucco buildings, inspect the window joints, floor expansion joints, penetration joints at the intersection of dissimilar façade materials, windows, pipes, signage, etc.
- On EIFS buildings, check the window joints, floor expansion joints, change of the façade materials and all penetrations.
Air, Water & Vapor Barriers
In recent years there have been many “new and improved” air, water and vapor barrier products from both new and old manufacturers. The use, or non-use, of air, water and vapor barriers has become driven by marketing plans rather than the experience/performance in the local market place. Since the building envelope and interior environment must function in harmony to prevent condensation issues, it is extremely important that both the exterior envelope consultant and the mechanical engineer are involved in the process of choosing which product to use. Yet many mechanical engineers are seldom asked about their building settings.
On a recent large office project the mechanical engineer assumed the wall and roof assemblies to have R-values of 13 and 19 respectively. The engineer was informed the designed wall assemblies had an R-value of 33 and, that due to the design of the roof, a large percentage of it had an R-value over 72. After the mechanical engineer picked himself up from the floor, he jokingly stated all that was needed for the mechanical design to function was ice cubes in the summer and wooden matches for the winter with some properly sized fans! Subsequently, the mechanical engineer calibrated the equipment to run appropriately. One can only imagine what would have happened if the equipment had been set to his original figures. This is why dew point calculations are recommended on all roof and wall assemblies. The dew point calculation should be material and site specific, not just generally completed for a similar environment.
Cavity/Rainscreen & Barrier Walls
Most buildings have cavity/rainscreen, barrier walls, or a combination of both. Some examples of cavity or rainscreen wall assemblies are brick, metal panels, stucco and any other wall system that has a drainage and/or air cavity behind the façade element. These types of wall assemblies have a backup system for moisture protection and an integrated weep system to allow water and condensation to escape.
A barrier wall assembly is one that as the precipitation hits the exterior surface of the wall assembly, the moisture is stopped. Common barrier wall assemblies include, but are not limited to, non-drainable EIFS, some metal panel designs, tilt up and precast panels. There may, or may not be, an air, water and/or vapor membrane incorporated into these assemblies. Key components of cavity and barrier wall assemblies are end dams at the intersection of changing façade elements, the presence of expansion joints or soft joints at floor levels and a weep system for the accidental moisture that can be present.
Buildings designed with these two wall assemblies have different planes of intersection, but typically do not have details to illustrate how these critical points of intersection are to be waterproofed. The most common areas of failure in wall assemblies are at the intersection of products or differing wall assemblies.
Ongoing maintenance items:
- Inspect the barrier material and sealants for cracks.
- Look for water stains at the weep system locations and the presence of effloresce on the wall surfaces as these conditions may be evidence of a system that is not properly functioning.
- Inspect the EIFS walls for damage, exposed reinforcing mesh and the thickness of the EIFS finish coat.
Waterproofing System

The selection of below-grade waterproofing materials depends on the findings presented in the soils report, location of the project and commonly used products in that particular marketplace. For example, on the “doughnut” expansion project of the Texas State Capitol, the waterproofing had to resist both the soil loads and local soils of Austin. The products that best fit the design and findings of the soils report was a bentonite based product on the vertical walls and a hot rubberized asphalt on the horizontal areas. One of the most critical details was at the intersection of these two products. The underlying challenge was that these two waterproofing systems are chemically different. To resolve the issue, technical persons from each manufacturer met to create a warranted tie-in detail.
Ongoing maintenance items:
- Make certain the landscaping is sloped away from the building.
- If applicable, ensure that the subsoil drainage is functioning properly.
- Verify that there are no new penetrations created by other trades after the waterproofing is in place.
Note: For elevator pits, place the waterproofing on the positive side of the wall leaving the interior (negative) side of the wall available to waterproof just in case there is leak!
The building envelope requirements have been challenged with a bombardment of different elements over the years. Keep in mind that gravity always works, so a drainage system is important. Also, if water never gets to the waterproofing, leaks will not occur. There are always two or more choices in the world of moisture protection systems. The key is to have the proper information to make the right choice first.
PSG is a building envelope moisture protection consultation firm that has worked on projects around the world. PSG works with architects in the design phase, general contractors and installers during the construction phase, owners and property managers during the building operation phase and attorneys when these different phases are not complimentary to the building operation phase. Mr. Zdenek has combined his chemistry background, understanding of moisture protection products and knowledge of construction to scientifically determine product compatibility with long-term performance and to professionally solve problems. He also works as an expert witness on building envelope issues including roofing, window systems, various building façade elements, flashing details and air, water and vapor barriers. Mr. Zdenek can be reached at 763-755-4777 or psgzeke@earthlink.net.